
How to Effectively Flush Your Water Heater for Optimal Performance
To effectively flush your water heater, regardless of whether it’s a traditional tank or a modern tankless unit, begin by prioritizing safety: always shut off the power or gas supply and the cold water inlet first. For a conventional tank water heater, connect a garden hose to the drain valve at the bottom of the tank, open the valve, and let it drain completely, then briefly open the cold water supply valve to agitate and flush out remaining sediment until the water runs clear. Tankless water heaters require a specialized flushing kit to circulate a descaling solution through the system, dissolving mineral buildup in the heat exchanger. Regular flushing is crucial for maintaining efficiency, extending appliance lifespan, and preventing costly repairs due to sediment accumulation. While a DIY approach is possible for straightforward tank flushes, the intricate nature of tankless units or signs of significant sediment buildup warrant professional intervention to ensure safety and proper operation.
Key Takeaways
- Prioritize Safety: Always turn off the power/gas and cold water supply before beginning any flushing procedure to prevent injury or damage.
- Sediment Removal is Crucial: Regular flushing prevents mineral and sediment buildup, which can reduce efficiency, shorten lifespan, and lead to expensive repairs.
- Tank vs. Tankless: Flushing methods differ significantly; tank heaters drain sediment, while tankless units circulate a descaling solution.
- Frequency Varies: Flush tank water heaters annually, or bi-annually in hard water areas. Tankless units generally require professional descaling every 1-2 years.
- Consider Professional Service: For tankless units, stubborn sediment, or any uncertainty, hiring a licensed plumber ensures a safe and thorough flush, often identifying other potential issues.
Why Regular Water Heater Flushing is Essential for Longevity and Efficiency
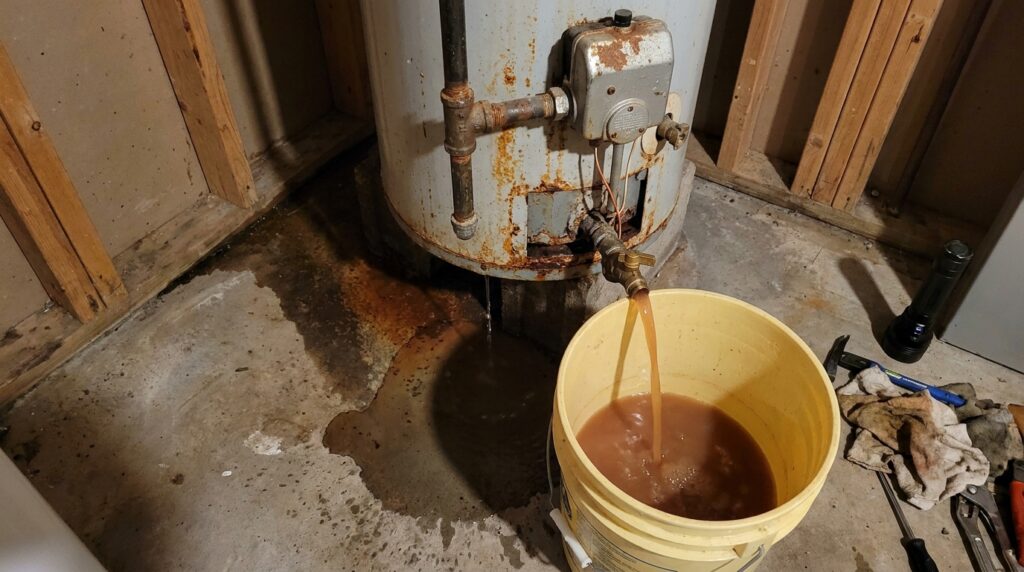
Regularly flushing your water heater is paramount to its long-term health and your household’s energy efficiency. Over time, minerals like calcium and magnesium, naturally present in water (especially hard water), precipitate out and accumulate at the bottom of conventional water heater tanks or within the heat exchangers of tankless units. This sediment acts as an insulator, forcing the heating elements or gas burners to work harder and longer to heat the water, directly translating to higher energy bills. According to the U.S. Department of Energy, sediment buildup can reduce a tank water heater’s efficiency by up to 50% over its lifespan.
Beyond efficiency loss, sediment buildup creates several other problems. In tank heaters, it can cause rumbling or popping noises as trapped water boils beneath the sediment layer. This stress can eventually weaken the tank’s lining, leading to corrosion, leaks, and premature failure. For tankless units, mineral scale can obstruct the narrow pathways within the heat exchanger, significantly reducing hot water flow and leading to system shutdowns or diminished performance. A proactive approach with routine flushing safeguards your investment, ensures a consistent supply of hot water, and significantly reduces the likelihood of an unexpected breakdown, which often necessitates costly water heater repair services.
Ignoring the need for regular maintenance is a common professional mistake homeowners make. While a water heater might seem like a “set it and forget it” appliance, consistent attention, particularly flushing, can extend its operational life by several years. Consider flushing a preventative measure, much like changing the oil in your car; it’s a small effort that yields significant long-term benefits in performance and cost savings.
Step-by-Step Guide to Flushing a Traditional Tank Water Heater
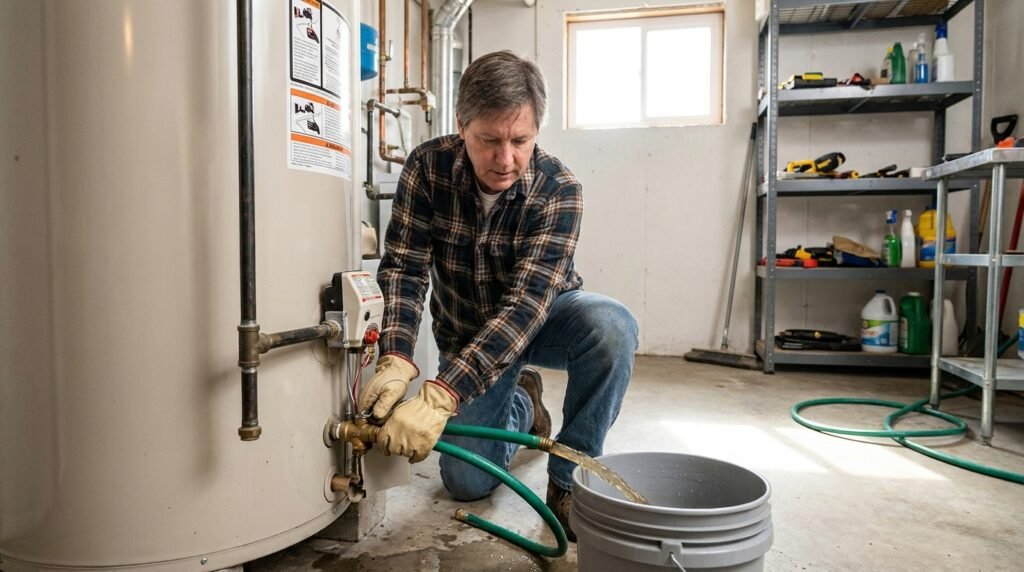
Flushing a traditional tank water heater is a manageable task for most homeowners, provided they follow safety protocols and specific steps. This process applies to both gas and electric tank models, with minor differences primarily in the initial power/gas shut-off.
Gather Your Tools
- Garden hose (long enough to reach a drain or outdoor area)
- Bucket (optional, for catching initial water or sediment samples)
- Flathead screwdriver (if your drain valve requires it)
- Work gloves (to protect hands from hot water)
- Safety glasses (recommended)
The Flushing Process
- Turn Off the Power/Gas Supply:
- For Electric Water Heaters: Go to your home’s main electrical panel and flip the circuit breaker labeled for your water heater to the “OFF” position. This prevents the heating elements from burning out if the tank empties while still receiving power.
- For Gas Water Heaters: Locate the gas valve on the supply line leading to the water heater. Turn the knob to the “OFF” position. Additionally, turn the thermostat setting on the water heater itself to “PILOT” or the lowest setting to prevent the burner from firing.
This critical first step ensures safety and protects the appliance from damage.
- Shut Off the Cold Water Supply: Locate the cold water inlet valve at the top of your water heater, usually identifiable by a blue handle or pipe. Turn this valve clockwise until it is completely closed. This prevents new cold water from entering the tank while you are draining it.
- Open a Hot Water Faucet: Go to a hot water faucet inside your house, preferably on an upper floor, and turn it on to the highest hot setting. This creates a vacuum break, allowing air to enter the water heater tank as water drains, preventing a siphon effect and speeding up the draining process. Leave it open throughout the flush.
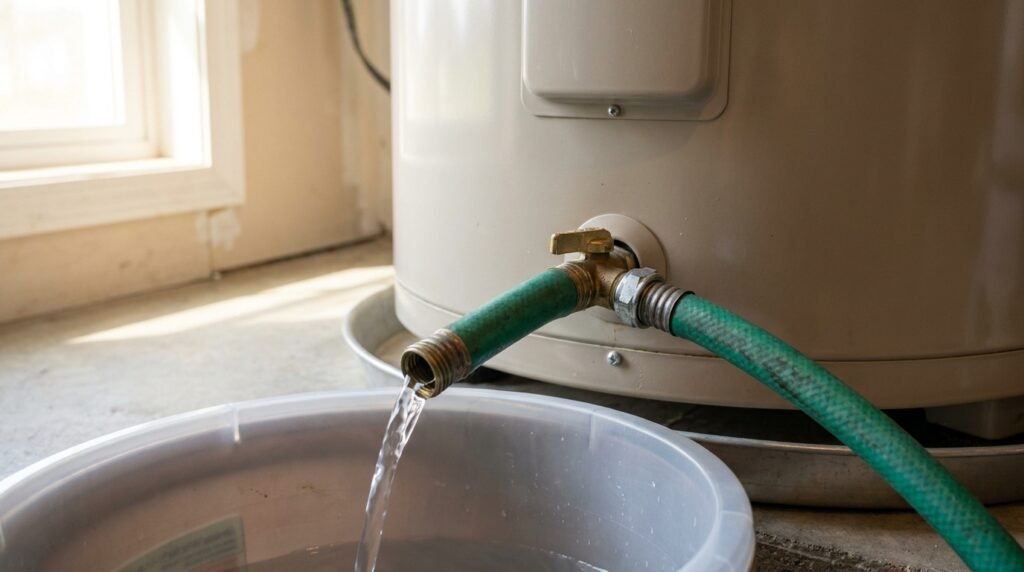
- Connect the Garden Hose: Locate the drain valve at the bottom of your water heater tank. It typically looks like a spigot. Attach one end of your garden hose to this drain valve.
- Route the Hose to a Safe Drainage Point: Direct the other end of the garden hose to a suitable drainage area, such as a floor drain, utility sink, or outside away from your foundation. Ensure the hose is positioned downhill to allow for proper gravity drainage. The water will be hot, so avoid draining it onto plants or sensitive surfaces.
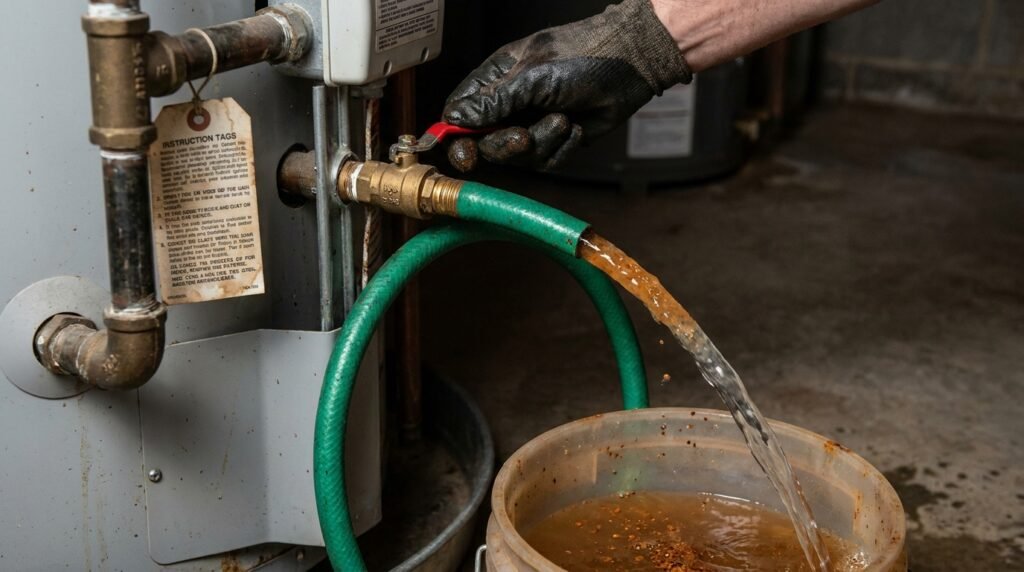
- Open the Drain Valve: Carefully open the drain valve on the water heater. You may need a flathead screwdriver or pliers, depending on the valve type. Hot water and sediment will begin to flow out through the hose. Allow the tank to drain completely. This can take 20-60 minutes, depending on tank size and sediment levels.
- Flush Out Remaining Sediment: Once the tank is nearly empty and the water flow slows or stops, briefly open the cold water supply valve (the one you closed in step 2) for a few minutes. This allows fresh cold water to rush into the tank, stirring up and dislodging any remaining sediment at the bottom. The water flowing out of the hose will likely become cloudy or discolored again.
- Repeat Flushing (If Necessary): Close the cold water supply valve again and let the tank drain. Repeat step 7 (briefly open cold water supply, then close) until the water flowing out of the hose runs clear. This indicates that most of the sediment has been removed.
- Close the Drain Valve and Disconnect Hose: Once the water runs clear, tightly close the drain valve on the water heater. Disconnect the garden hose.
- Refill the Tank: Go back to the cold water supply valve at the top of the water heater and slowly open it completely. You will hear the tank refilling. Before moving to the next step, ensure the hot water faucet you opened in step 3 is still open. Once water starts flowing steadily from that faucet (without sputtering), it indicates the tank is full and air has been purged. Close the hot water faucet.
- Restore Power/Gas:
- For Electric Water Heaters: Return to your electrical panel and flip the circuit breaker back to the “ON” position.
- For Gas Water Heaters: Turn the gas valve on the supply line back to “ON” and reset your water heater thermostat to your desired temperature. If your pilot light went out, you may need to relight it according to your water heater’s instructions.
- Check for Leaks: Inspect the drain valve connection and any other fittings for leaks. Address any drips immediately.
An expert recommendation is to perform this flush annually. In areas with very hard water, consider flushing every six months. Neglecting this simple maintenance can lead to scale buildup so severe that the drain valve becomes clogged, requiring a professional to address the issue.
Maintaining Tankless Water Heaters: The Descaling Process
Flushing a tankless water heater differs significantly from a tank unit because there’s no storage tank to drain. Instead, the process involves circulating a descaling solution through the heat exchanger to dissolve mineral deposits. This specialized procedure is often referred to as “descaling.”
Why Tankless Units Need Descaling
Tankless water heaters heat water on demand by passing it through a heat exchanger. When hard water flows through these narrow passages, minerals can precipitate and form scale, restricting water flow and reducing heating efficiency. Left unaddressed, this can damage the unit and lead to costly tankless water heater repair needs.
Tools for Descaling a Tankless Water Heater
- Tankless water heater flushing kit (includes a small submersible pump, two hoses, and a 5-gallon bucket)
- White vinegar or a professional descaling solution (e.g., Flow-Aide, RYDLYME)
- Adjustable wrench
- Work gloves and safety glasses
The Descaling Process
- Turn Off Power/Gas: Crucially, turn off the electrical power or gas supply to the tankless unit. This prevents the unit from firing up during the process.
- Shut Off Cold and Hot Water Inlet Valves: Locate the cold and hot water service valves (often marked or colored blue/red) connected to the tankless unit. Turn both completely off. Most tankless installations include dedicated service valves with purge ports for this maintenance.
- Connect Flushing Hoses:
- Attach one hose from the flushing kit to the hot water service valve’s purge port (usually a small valve with a cap).
- Attach the second hose from the cold water service valve’s purge port to the submersible pump in your 5-gallon bucket.
Ensure all connections are tight.
- Open Purge Ports and Close Isolation Valves: Open the purge port valves on both the hot and cold water service valves. Then, ensure the main isolation valves (the larger handles on the hot and cold water lines leading to the unit) are closed. This isolates the unit from your home’s plumbing.
- Prepare Descaling Solution: Fill the 5-gallon bucket with 2-3 gallons of white vinegar or the recommended amount of a commercial descaling solution diluted with water, as per product instructions. Place the submersible pump into the solution.
- Circulate the Solution: Plug in the submersible pump. It will circulate the descaling solution through the tankless water heater’s heat exchanger, dissolving mineral buildup. Let the solution circulate for at least 45 minutes to 1 hour. For heavily scaled units, this might extend to 2 hours.
- Flush with Fresh Water: After descaling, unplug the pump. Close the hot water purge port valve. Slowly open the cold water supply isolation valve to allow fresh water to flush out the descaling solution and any dissolved sediment through the open cold water purge port and hose into a drain. Run fresh water for 5-10 minutes until the water runs clear and no longer smells of vinegar.
- Disconnect Hoses and Restore Service: Close the cold water purge port valve. Disconnect the flushing hoses. Replace the caps on the purge ports.
- Open Isolation Valves and Restore Power/Gas: Slowly open both the main cold and hot water supply isolation valves to the tankless unit. Finally, turn the power or gas supply back on to the unit.
- Check for Leaks: Thoroughly inspect all connections for any leaks.
The complexity and need for specific equipment make tankless water heater descaling a task many homeowners prefer to delegate to water heater company. Professional tankless water heater maintenance services often include a comprehensive inspection of the unit’s components, ensuring optimal performance and detecting potential issues early.
Comparing Water Heater Flushing Procedures
Understanding the fundamental differences in flushing methods for various water heater types helps in determining the necessary tools and approach for proper maintenance.
| Feature | Traditional Tank Water Heater Flush | Tankless Water Heater Descaling |
|---|---|---|
| Primary Goal | Remove sediment (calcium, magnesium) from tank bottom. | Dissolve mineral scale from heat exchanger coils. |
| Frequency | Annually (or bi-annually in hard water areas). | Every 1-2 years, depending on water hardness. |
| Key Tools | Garden hose, flathead screwdriver, bucket. | Flushing kit (pump, hoses, bucket), descaling solution. |
| Main Process | Drain tank completely, then use fresh water to agitate and flush residual sediment. | Circulate descaling solution through heat exchanger, then flush with fresh water. |
| Complexity (DIY) | Relatively low, manageable for most homeowners. | Moderate to high, requires specialized kit and careful valve manipulation. |
| Professional Cost Range | $75 – $200 | $150 – $400 |
Signs Your Water Heater Needs Immediate Attention
Identifying early warning signs that your water heater is struggling with sediment buildup or other issues can prevent minor problems from escalating into major system failures. Regular maintenance, including flushing, addresses many of these symptoms before they become critical.
- Reduced Hot Water Supply: If your hot water runs out faster than usual or takes longer to heat, sediment buildup could be insulating the heating elements or restricting flow in a tankless unit.
- Strange Noises: Rumbling, popping, or banging sounds from a tank water heater typically indicate sediment at the bottom of the tank. Water trapped beneath this layer boils and escapes, creating noise and stressing the tank’s integrity.
- Cloudy or Rusty Water: Sediment in the tank can get stirred up and exit through your hot water faucets, appearing cloudy. Rusty-colored water often signals advanced corrosion inside the tank, an issue exacerbated by sediment.
- Lower Water Pressure: Blockages from mineral scale in the hot water lines or within a tankless unit’s heat exchanger can lead to a noticeable drop in hot water pressure.
- Leaks Around the Base: While sometimes indicating a larger issue requiring water heater replacement, minor leaks around the drain valve can be a sign of sediment impacting the valve’s seal, or more severe leaks could point to a compromised tank due to prolonged sediment stress.
- Foul Odors from Hot Water: A rotten egg smell usually indicates a reaction between the anode rod and bacteria in the water, a problem that can be worsened by stagnant water conditions caused by sediment.
If you observe any of these symptoms, it’s advisable to schedule a water heater flush or a professional inspection promptly. Addressing these issues early can prevent further damage and extend the life of your appliance.
When to Engage a Professional for Water Heater Flushing and Maintenance
While flushing a traditional tank water heater can be a DIY project, there are specific scenarios where professional intervention is not just recommended but often necessary for safety and effectiveness. Tankless water heater descaling, given its specialized nature, often falls into this category for many homeowners.
A professional plumber offers expertise that goes beyond simply draining or circulating a solution. They can accurately diagnose underlying issues, ensure components are properly reassembled, and identify potential problems before they escalate. For instance, a professional will inspect the anode rod – a sacrificial component designed to corrode before the tank itself – and recommend replacement if it’s depleted. The average cost for professional water heater flushing services typically ranges from $75 to $200 for tank units and $150 to $400 for tankless units, depending on location and the complexity of the job, which can include the water heater maintenance itself.
Specific Situations Requiring Professional Assistance:
- No Prior Flushing History: If your water heater has never been flushed, or it’s been many years, the sediment buildup can be extremely heavy. This increases the risk of clogging the drain valve or causing damage during the process.
- Clogged Drain Valve: If you attempt to flush your tank and the drain valve is clogged with sediment, a professional has specialized tools and techniques to clear the blockage without damaging the valve or tank.
- Tankless Water Heater Descaling: While some DIY kits exist, the precise connection of hoses, proper circulation, and use of descaling agents require a certain level of comfort and understanding. Professionals are equipped with the right tools and knowledge for safe and thorough descaling.
- Leaks or Unusual Noises After Flushing: If you notice new leaks or persistent strange noises after a DIY flush, it indicates a problem that needs expert diagnosis and repair.
- Gas or Electrical Concerns: Any discomfort with shutting off and restoring gas lines or working with electrical panels means it is always safer to call a professional.
- Hybrid Heat Pump Water Heaters: These units combine tank storage with heat pump technology and have unique maintenance requirements, including flushing, which professionals are best equipped to handle. Hybrid heat pump maintenance often involves checking refrigerant levels and coils in addition to flushing.
- Warranty Requirements: Some manufacturers require professional service to maintain warranty validity, especially for newer or high-efficiency models.
Opting for professional service provides peace of mind, ensuring the job is done correctly, safely, and comprehensively, often preventing more expensive repairs down the line. A properly maintained water heater is a cornerstone of a comfortable and efficient home, and The Hot Water Heater Pros is here to help ensure it stays that way.
